Using MNIST dataset from TensorFlow
Google's TensorFlow provides a library for using MNIST dataset in a simplified manner. This is a three-line code to prepare the dataset.
import tensorflow as tf
from tensorflow.examples.tutorials.mnist import input_data
mnist = input_data.read_data_sets("/tmp/data/", one_hot=True)
Now you can access the dataset through the following objects.
mnist.train.imgaes   # Images in the training set.
mnist.train.lables   # Labels in the training set.
mnist.test.images    # Images in the test set.
mnist.test.lables    # Labels in the test set.
Images are represented by one-dimensional lists with 28x28=784 elements as below. Each element has a float value ranging between 0 and 1.
print mnist.test.images[0]
[ 0.          0.          0.          0.          0.          0.          0.
 ...
  0.32941177  0.72549021  0.62352943  0.59215689  0.23529413  0.14117648
  0.          0.          0.          0.          0.          0.          0.
  0.          0.          0.          0.          0.          0.          0.
  0.          0.          0.          0.          0.          0.          0.
  0.          0.8705883   0.99607849  0.99607849  0.99607849  0.99607849
  0.9450981   0.77647066  0.77647066  0.77647066  0.77647066  0.77647066
  0.77647066  0.77647066  0.77647066  0.66666669  0.20392159  0.          0.
  0.          0.          0.          0.          0.          0.          0.
  0.          0.          0.          0.26274511  0.44705886  0.28235295
  0.44705886  0.63921571  0.89019614  0.99607849  0.88235301  0.99607849
  0.99607849  0.99607849  0.98039222  0.89803928  0.99607849  0.99607849
  0.54901963  0.          0.          0.          0.          0.          0.
  0.          0.          0.          0.          0.          0.          0.
  0.          0.          0.          0.          0.06666667  0.25882354
  0.05490196  0.26274511  0.26274511  0.26274511  0.23137257  0.08235294
  0.92549026  0.99607849  0.41568631  0.          0.          0.          0.
...
  0.          0.          0.          0.        ]
Labels are represented by vectors with the one-of-K representation.
print mnist.test.labels[0]
[ 0.  0.  0.  0.  0.  0.  0.  1.  0.  0.]
Here is a quick example for showing sample images from the dataset.
images = mnist.test.images[0:10]
labels = mnist.test.labels[0:10]

fig = plt.figure(figsize=(8,4))
for c, (image, label) in enumerate(zip(images, labels)):
    subplot = fig.add_subplot(2,5,c+1)
    subplot.set_xticks([])
    subplot.set_yticks([])
    subplot.set_title('%d' % np.argmax(label))
    subplot.imshow(image.reshape((28,28)), vmin=0, vmax=1,
                   cmap=plt.cm.gray_r, interpolation="nearest")

In addition, you can use the next_batch method to retrieve specified number of data in a batch as below. It's convenient for supplying data to the stochastic gradient descent method.
batch_images, batch_labels = mnist.train.next_batch(100)
TensorFlow Tutorials gives an example of CNN to categorize this dataset with about 99% precision for the testset.
Using notMNIST dataset from TensorFlow
Once you are satisfied with the example in the tutorials, what would you do next? Here's an interesting challenge for you.
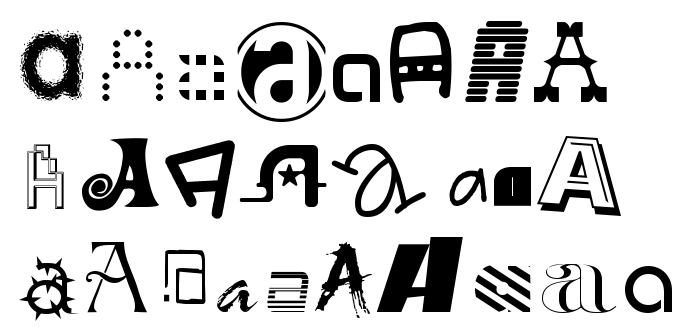
There is an notMNIST dataset available on a personal blog of Yaroslav Bulatov.
I've taken some publicly available fonts and extracted glyphs from them to make a dataset similar to MNIST. There are 10 classes, with letters A-J taken from different fonts. Here are some examples of letter "A"
I prepared a class to use the notMNIST dataset in the same way as MNIST dataset with TensorFlow.
import numpy as np
from sklearn.cross_validation import train_test_split
from PIL import Image
import os

class NotMNIST:
    def __init__(self):
        images, labels = [], []

        for i, letter in enumerate(['A', 'B', 'C', 'D', 'E', 'F', 'G', 'H', 'I', 'J']):
            directory = 'notMNIST_small/%s/' % letter
            files = os.listdir(directory)
            label = np.array([0]*10)
            label[i] = 1
            for file in files:
                try:
                    im = Image.open(directory+file)
                except:
                    print "Skip a corrupted file: " + file
                    continue
                pixels = np.array(im.convert('L').getdata())
                images.append(pixels/255.0)
                labels.append(label)

        train_images, test_images, train_labels, test_labels = \
            train_test_split(images, labels, test_size=0.2, random_state=0)

        class train:
            def __init__(self):
                self.images = []
                self.labels = []
                self.batch_counter = 0

            def next_batch(self, num):
                if self.batch_counter + num >= len(self.labels):
                    batch_images = self.images[self.batch_counter:]
                    batch_labels = self.labels[self.batch_counter:]
                    left = num - len(batch_labels)
                    batch_images.extend(self.images[:left])
                    batch_labels.extend(self.labels[:left])
                    self.batch_counter = left
                else:
                    batch_images = self.images[self.batch_counter:self.batch_counter+num]
                    batch_labels = self.labels[self.batch_counter:self.batch_counter+num]
                    self.batch_counter += num

                return (batch_images, batch_labels)

        class test:
            def __init__(self):
                self.images = []
                self.labels = []

        self.train = train()
        self.test = test()

        self.train.images = train_images
        self.train.labels = train_labels
        self.test.images = test_images
        self.test.labels = test_labels
Before using the class, you need to download and extract the raw data as below.
# curl -OL http://yaroslavvb.com/upload/notMNIST/notMNIST_small.tar.gz
# tar -xzf notMNIST_small.tar.gz
And you can just create an instance of the class.
import numpy as np
import matplotlib.pyplot as plt
mnist = NotMNIST()
It provides the same objects and methods as in the MNIST dataset.
mnist.train.imgaes   # Images in the training set.
mnist.train.lables   # Labels in the training set.
mnist.test.images    # Images in the test set.
mnist.test.lables    # Labels in the test set.
mnist.train.next_batch() # To retrieve specified number of data in a batch
This is an example of showing sample images from the dataset.
fig = plt.figure(figsize=(8,8))
for i in range(10):
    c = 0
    for (image, label) in zip(mnist.test.images, mnist.test.labels):
        if np.argmax(label) != i: continue
        subplot = fig.add_subplot(10,10,i*10+c+1)
        subplot.set_xticks([])
        subplot.set_yticks([])
        subplot.imshow(image.reshape((28,28)), vmin=0, vmax=1,
                       cmap=plt.cm.gray_r, interpolation="nearest")
        c += 1
        if c == 10: break

Applying CNN to notMNIST dataset.
Applying the same CNN in the tutorial to this dataset, I achieved 94% precision. These are sample images which were categorized correctly.

You may be amazed by the robustness of the model which succeeded to recognize the letter in the cupid ;)
However, it's not yet perfect. Here are some examples which the model failed to recognize. The labels on top of images indicate "Prediction/Correct answer", and the bar charts on the right show the confidence level for each letter. 0 to 9 correspond to "A" to "J".

Now the challenge is how you can improve the model to achieve higher precision!
Disclaimer: All code snippets are released under Apache 2.0 License. This is not an official Google product.